Cabinet Planning
Two-Tone Kitchen Cabinets: Plan Colour Zones, Panels and Finish Handoffs
Compare three two-tone cabinet layouts, map visible panels, and use a finish worksheet to connect materials, samples and your written kitchen scope.
Two-tone kitchen cabinets work as a complete design when the finish changes have clear boundaries. Decide where each colour starts and stops, then carry that decision through the doors, drawer fronts, exposed ends and trim. Two attractive samples alone leave too many decisions open.
Use the same kitchen layout to compare three approaches: split the uppers and lowers, give the island its own finish, or group the tall cabinets into a colour block. The examples and worksheet below help turn that choice into a written cabinet scope. The 2016 and 2020 Mississauga kitchens are part of Chris Chen's personal project experience from before Yellow Pencil Inc. was founded. They show how the approach can look in a real project, with their recorded historical prices and separately confirmed production and installation stages.
1. Give each colour a job in the room
Start with a short brief: “We want the island to be the focal point,” or “We want the tall cabinets to read as one group.” A clear purpose gives you something to check when comparing options.
Record the elements that will stay: flooring, countertops, backsplash, appliances and lighting. If those elements are being replaced, mark them as undecided rather than approving a cabinet finish against an assumed selection. Photograph the room from the entrance and from the main living or dining area so you can discuss the cabinet faces people will actually see.
Choose two provisional labels, Finish A and Finish B. Each label will eventually need a material, finish specification and approved physical sample. “White” or “wood” is only a starting description: painted MDF and stained maple describe different cabinet materials and treatments, even when a screen makes their colours appear similar.
Keep the cabinet layout fixed while comparing the colour zones. Moving cabinets and changing finishes at the same time makes it harder to see which choice is creating the effect you want.
2. Compare three colour-zone plans on the same layout
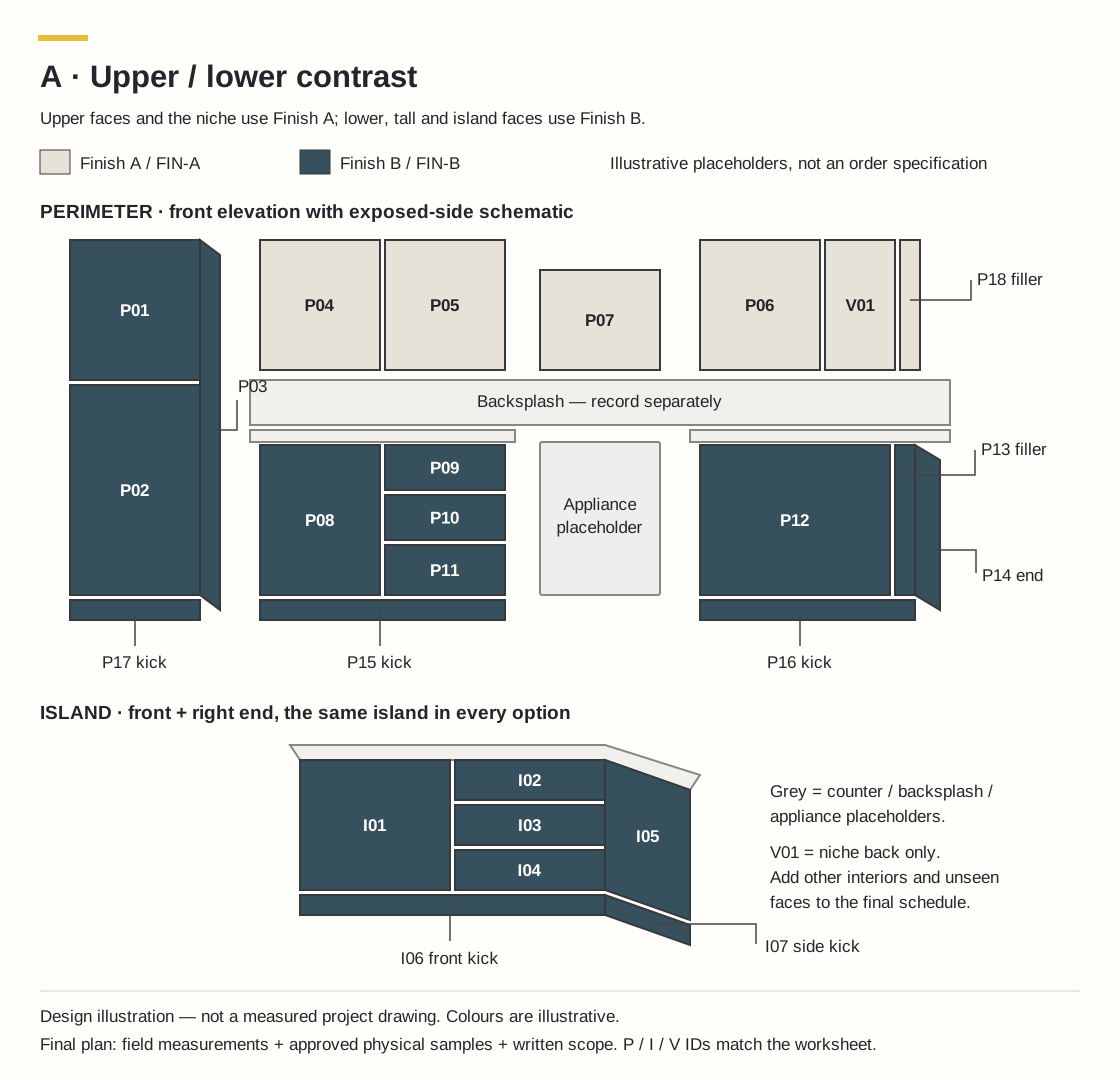
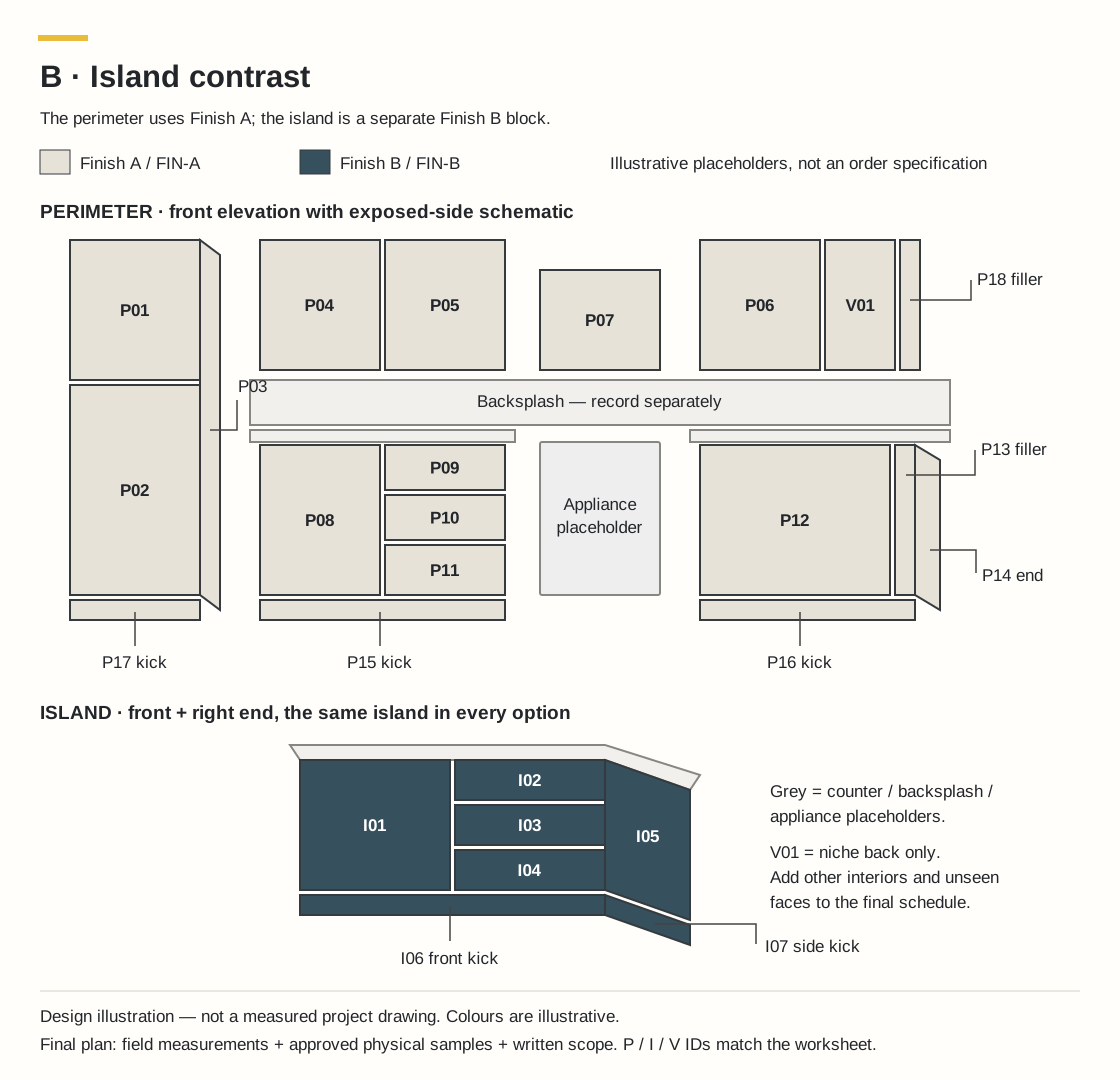
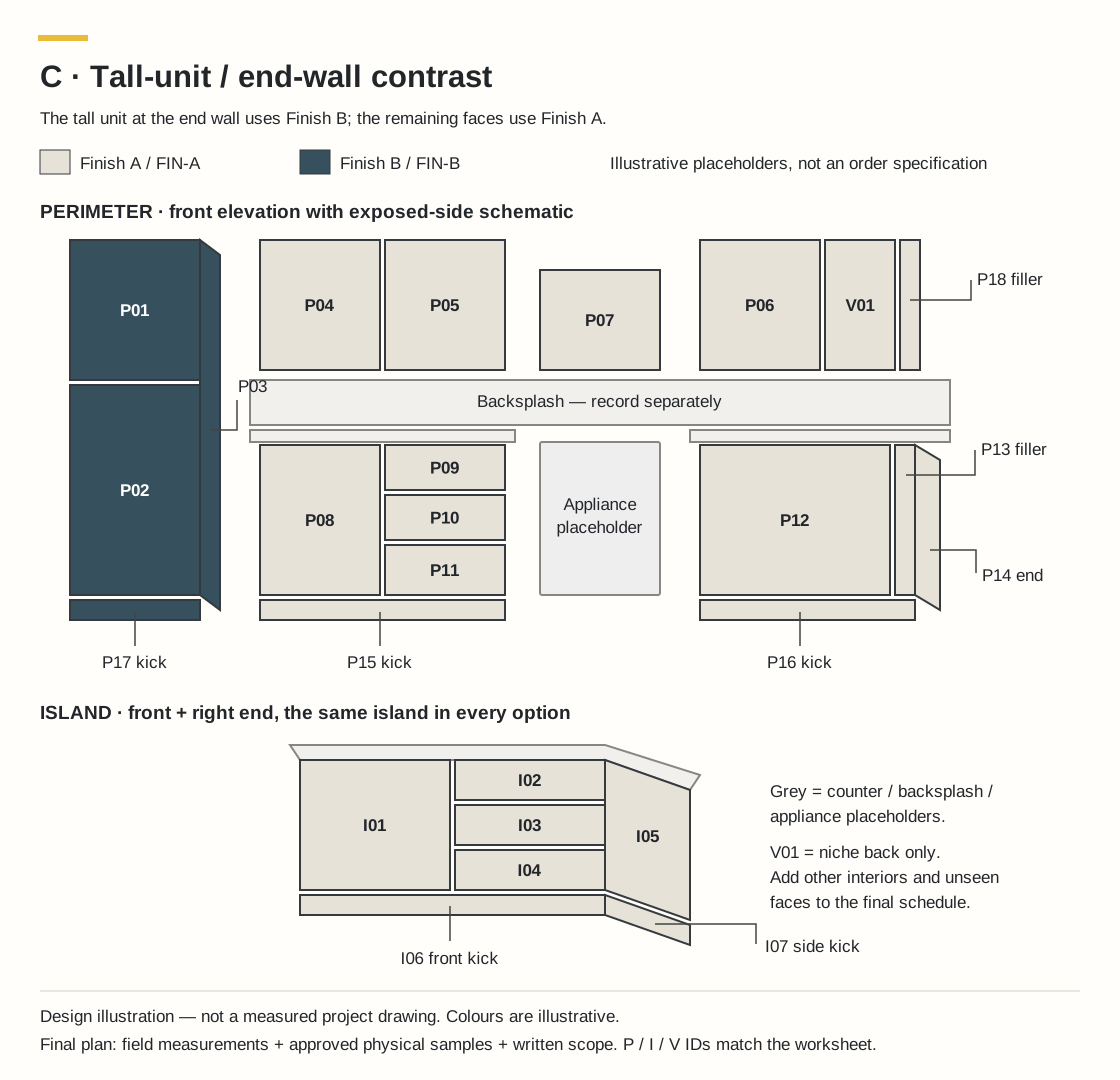
Design illustrations: the three options use one simplified layout to compare finish placement. They are not measured drawings, additional completed projects or alternatives considered by the owners of the two kitchens below. Finish A and Finish B are illustrative labels.
Option A: separate the upper and lower cabinets
Assign one finish to the upper doors and another to the lower doors and drawer fronts. Then look at the places where that simple division breaks down: a full-height pantry, a refrigerator surround, the end of a cabinet run or a hood enclosure.
Choose the tall-unit finish deliberately. If the tall group uses Finish A, show exactly where it meets the lower cabinets in Finish B. Decide whether an exposed end panel follows the doors beside it or forms a continuous block with the tall unit. That meeting point belongs on the drawing and finish schedule.
This is a useful option to compare when your design goal is to make the upper and lower runs read separately. View the entire wall elevation before deciding; two loose door samples cannot show the size or position of those colour areas.
Option B: give the island a separate finish
Keep the perimeter cabinets in Finish A and assign Finish B to the island. Review the island from all sides, including the seating side and the view from the adjoining room.
Mark the island doors, drawer fronts, exposed ends, back panels, open shelving and toe kick individually. An island can look resolved from its working side while still having an undecided seating-side panel. If shelving is open, include its visible interior and shelf edges in the finish decision.
The 2016 Mississauga kitchen below provides a real example of a light perimeter with a stained maple island. Its island-end bookshelf is also a reminder to review more than the door fronts.
Option C: group the tall cabinets or end wall
Use the second finish to define a tall-unit group or a cabinet block at the end of the room. Follow the block from top to bottom and around any exposed return. Mark the exact point where it stops.
Check how the group meets the base run, upper cabinets and any display section. A filler or narrow return can sit at the boundary between two finishes; leaving it unnamed means the colour-zone plan is still incomplete. Include appliance panels in the review where they form part of the cabinet composition.
Compare all three options from the same viewpoints. Choose the one that best matches the purpose in your brief, then record its finish boundaries before changing any individual detail.
3. Assign a finish to every visible cabinet face
A colour-zone drawing shows the overall idea. A finish schedule makes each part identifiable for the quotation, drawings and production review.
Open the fillable / printable finish handoff worksheet · Download the blank CSV face schedule
The worksheet includes material and physical-sample references, surrounding finishes, open decisions, responsibilities and review fields. Fields are not submitted or stored. To keep your completed entries, use Print / save as PDF before reloading or closing the tab.
| Face ID | Visible face | Option A | Option B | Option C | Your project finish / sample |
|---|---|---|---|---|---|
| P01 | Tall unit — upper door | FIN-B | FIN-A | FIN-B | To confirm |
| P02 | Tall unit — lower door | FIN-B | FIN-A | FIN-B | To confirm |
| P03 | Tall unit — exposed right side | FIN-B | FIN-A | FIN-B | To confirm |
| P04 | Upper cabinet — left door | FIN-A | FIN-A | FIN-A | To confirm |
| P05 | Upper cabinet — middle door | FIN-A | FIN-A | FIN-A | To confirm |
| P06 | Upper cabinet — right door | FIN-A | FIN-A | FIN-A | To confirm |
| P07 | Hood enclosure — visible front | FIN-A | FIN-A | FIN-A | To confirm |
| P08 | Base cabinet — left door | FIN-B | FIN-A | FIN-A | To confirm |
| P09 | Base cabinet — upper drawer front | FIN-B | FIN-A | FIN-A | To confirm |
| P10 | Base cabinet — middle drawer front | FIN-B | FIN-A | FIN-A | To confirm |
| P11 | Base cabinet — lower drawer front | FIN-B | FIN-A | FIN-A | To confirm |
| P12 | Base cabinet — right door | FIN-B | FIN-A | FIN-A | To confirm |
| P13 | Base cabinet — right filler | FIN-B | FIN-A | FIN-A | To confirm |
| P14 | Base cabinet — exposed right end panel | FIN-B | FIN-A | FIN-A | To confirm |
| P15 | Toe kick — left base run | FIN-B | FIN-A | FIN-A | To confirm |
| P16 | Toe kick — right base run | FIN-B | FIN-A | FIN-A | To confirm |
| P17 | Toe kick — tall unit | FIN-B | FIN-A | FIN-B | To confirm |
| P18 | Upper cabinet — right filler | FIN-A | FIN-A | FIN-A | To confirm |
| I01 | Island — left door | FIN-B | FIN-B | FIN-A | To confirm |
| I02 | Island — upper drawer front | FIN-B | FIN-B | FIN-A | To confirm |
| I03 | Island — middle drawer front | FIN-B | FIN-B | FIN-A | To confirm |
| I04 | Island — lower drawer front | FIN-B | FIN-B | FIN-A | To confirm |
| I05 | Island — exposed right end panel | FIN-B | FIN-B | FIN-A | To confirm |
| I06 | Island — front toe kick | FIN-B | FIN-B | FIN-A | To confirm |
| I07 | Island — right-side toe kick | FIN-B | FIN-B | FIN-A | To confirm |
| V01 | Open niche — visible back panel | FIN-A | FIN-A | FIN-A | To confirm |
Option A/B/C identify the three layouts above. FIN-A and FIN-B mean Finish A and Finish B: placeholder finish labels, not real paint names or an approved order. Add any other visible face or exposed edge from the final measured drawings.
Use the worksheet to identify each location and visible part, its Finish A or Finish B assignment, the actual material and finish specification, and the sample used for approval. Give unresolved items a clear “to confirm” entry. A blank cell can easily be mistaken for an instruction to repeat the adjacent finish.
Review these parts around each colour boundary:
- Doors and drawer fronts: identify the finish for each run and any exceptions within it.
- Exposed end panels and returns: show which colour wraps around the side and where it stops.
- Fillers and trim: identify the finish at wall junctions and between cabinet groups.
- Toe kicks: confirm the finish under each zone, including any transition around an island corner.
- Hood enclosure: confirm its visible faces if it is part of the cabinet scope.
- Visible interiors: include open shelves, glass-front sections and other areas seen during normal use.
For example, “island in Finish B” still needs a decision about the seating-side panel and any open bookshelf. Mark those parts on the same drawing as the doors. Do not infer the interior finish of a closed cabinet from a photograph of its exterior.
Use the same labels throughout the documents. If a sample selection changes, update the schedule and affected drawing together before the finish is released for production.
Turn one finish label into a reviewable handoff
Take P14, the exposed right end panel, in illustrative Option A. The table assigns it FIN-B, but that label alone does not say which panel material, finish specification or physical sample should be used. A useful handoff keeps the missing information visible:
| Check for this illustrative P14 panel | What to record for your project |
|---|---|
| Location and boundary | Identify P14 on the current drawing; show the face it meets and whether the finish wraps around the exposed edge. |
| Material and finish | Record the actual panel material and finish specification. Leave them “to confirm” until selected; do not copy a material from a photograph. |
| Sample reference | Add the reference on the physical sample being reviewed, together with its review status. A FIN-B label is not a sample approval. |
| Drawing and schedule version | Put the same revision reference on both documents so a changed panel is not paired with an older finish schedule. |
| Open decision and next review | Name who will confirm the unresolved item and which document or sample must be reviewed next. |
P14 is part of the generic planning illustration, not a new project record. No material, sample or production approval has been supplied for it.
Use this distinction when comparing quotations. If a finish is still open, ask how that uncertainty is described in the quoted scope, allowance or exclusion. Do not assume that an early price discussion authorizes a particular material or releases the cabinets for production.
Before production, ask the responsible team to reconcile the confirmed measured drawings, each visible face, material and finish specifications, approved physical samples, and the document revisions being used. A finish change should return to the affected faces and their meeting points for review; changing the name in one cell leaves the handoff incomplete.
4. Coordinate the surrounding materials: two real Mississauga kitchens
Place the cabinet samples beside the selected countertop, backsplash and hardware. Record those selections alongside the cabinet finish schedule, including any item still undecided. This lets everyone discuss the same combination.
The two projects below show different material combinations and layouts. Their prices describe their own historical cabinet-and-countertop scope; they do not measure the cost of adding a second colour.
2016: a light painted perimeter and stained maple island
A 2016 project by Chris Chen, before Yellow Pencil Inc. was founded. 2016 Mississauga Two-Tone Kitchen: OC-117 spray-painted MDF perimeter cabinets, a Burnt Walnut stained maple island and Bianco Antico granite.
This kitchen pairs a light painted perimeter with a contrasting island. The recorded details include an island-end bookshelf, MagicCorner storage, a spice pullout and a prep sink. A Sub-Zero refrigerator and Wolf range are also recorded project features.
The material distinction matters: Burnt Walnut is the stain name used on maple in this project. It does not mean that the island is made of walnut. When preparing your own schedule, record the wood species and finish separately so that a stain name cannot be mistaken for the material.
| Recorded 2016 scope | Historical amount |
|---|---|
| Cabinets | CAD 21,000 |
| Countertop | CAD 6,000 |
| Cabinet and countertop total | CAD 27,000 |
The bookshelf creates another visible surface to resolve when planning an island colour zone. Use it as a prompt to check your own open shelving and island ends rather than copying only the front-facing colour combination.
View the 2016 Mississauga Two-Tone Kitchen project.
2020: navy cabinetry with a walnut island and display cabinets
A 2020 project by Chris Chen, before Yellow Pencil Inc. was founded. 2020 Mississauga Navy Walnut Kitchen: navy spray-painted MDF perimeter cabinets, a walnut angled island and display cabinets, and Caesarstone quartz.
This project combines navy painted cabinetry with walnut in the angled island and display cabinets. Its recorded features include stacked upper cabinets, a coffee station, pullouts, and a panel-ready JennAir refrigerator and dishwasher.
Here, walnut appears in more than the island. When developing a similar brief, mark each separate cabinet group that receives the wood finish and the point where it meets the painted cabinetry. Include the exposed sides and display areas in that review; a single note saying “navy and walnut” leaves their locations unresolved.
| Recorded 2020 scope | Historical amount |
|---|---|
| Cabinets | CAD 35,000 |
| Countertop | CAD 10,500 |
| Cabinet and countertop total | CAD 45,500 |
View the 2020 Mississauga Navy Walnut Kitchen project.
Price scope for both projects: the historical amounts exclude HST, include delivery and installation, and exclude plumbing and electrical work, as confirmed by Yellow Pencil’s owner. They are cabinet-and-countertop amounts for the stated years, not complete kitchen-renovation totals or current quotations. The listed appliances describe the projects; these amounts do not establish an appliance allowance. The 2020 total also cannot be used as a separate coffee-station price.
The Mississauga kitchen renovation service page records the historical project materials and cabinet/countertop prices.
5. Approve named physical samples in the actual room
Use the linked project photographs to discuss placement, materials and the relationship between cabinet groups. Use labelled physical samples to approve your own finishes. A photograph or screen image does not establish an exact colour match.
Place both cabinet samples with the intended countertop, backsplash and hardware in the kitchen. Review the combination from the room’s normal viewpoints and under the lighting you expect to use. Keep the discussion tied to the proposed colour zones: an attractive small sample still needs to work in the large or small area assigned to it.
Record the sample name or reference beside Finish A and Finish B. Note any selection still awaiting confirmation, then carry the approved references into the finish schedule. If one finish changes, check its meeting points and surrounding materials again before approving the revised combination.
6. Bring the colour-zone sheet into the written quotation
Send the chosen zone drawing and completed finish schedule with your kitchen photos and rough layout. Identify anything being retained and any countertop, backsplash or hardware choice that is still open. Ask for the cabinet scope to follow those same finish references, including the visible panels, trim, hood enclosure and interiors that apply to your project.
Keep price scope and delivery stages explicit. For the two historical kitchens described here, Yellow Pencil’s owner confirmed the following stages:
| Stage | Confirmed historical timing for both cases |
|---|---|
| Cabinet production | 5 weeks |
| Cabinet installation on site | 1 day |
| Countertop templating | The day after cabinet installation |
| Countertop installation | One week after templating; 1 installation day |
The five weeks describe cabinet production. Cabinet installation, countertop templating and countertop installation are separate stages. There is no verified total elapsed project duration or exact completion date for these examples, and their historical sequence is not a promised schedule for a new kitchen. Confirm the production and site stages in the written scope for your own project.
For a two-tone cabinet consultation, send Yellow Pencil your kitchen photos, a rough layout, details of the countertop and flooring you plan to keep, and two candidate finishes. Include the colour-zone option you prefer and the parts still marked “to confirm.” That gives the discussion a clear starting point for a written custom-cabinet scope.